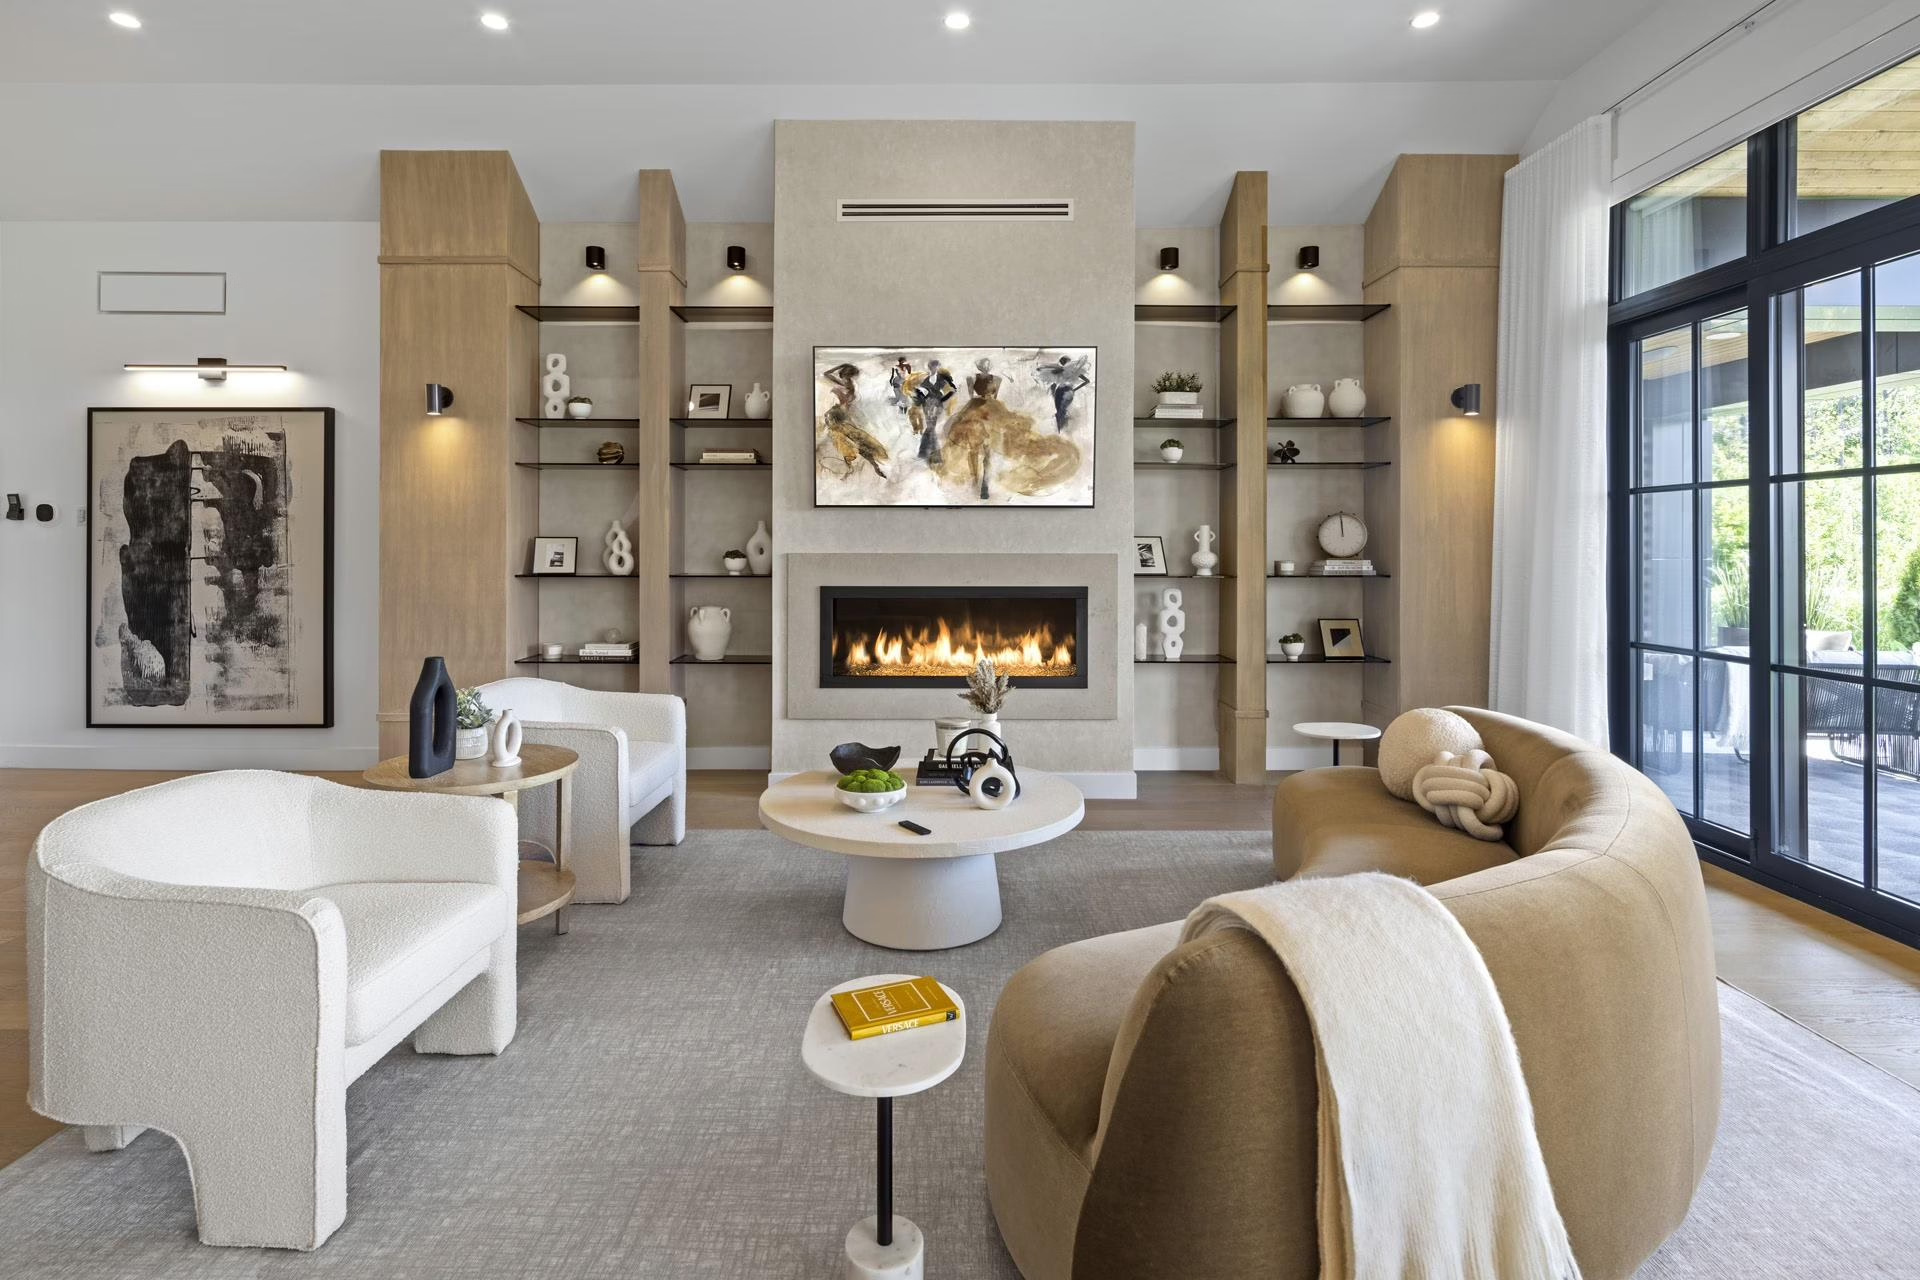
A homeowner’s guide to creating a complete interior that looks considered, feels comfortable, and works beautifully every day.
A luxury interior renovation coordinates layout, materials, lighting, custom millwork, and building systems across the home. It starts with measured space planning and technical feasibility, followed by coordinated selections and construction documentation. The aim is a complete interior that supports daily life as well as a consistent design direction.
The kitchen you saved looks wonderful. So does the bathroom with the carved stone vanity. The difficulty begins when you try to imagine them in the same home, alongside the staircase you want to keep, the furniture you already own, and the storage your family actually needs.
A luxury interior renovation is the work of resolving those relationships. It combines space planning, materials, lighting, custom details, and building systems into a home that makes sense as a whole. An impressive finish can be part of that result. It cannot do the planning for you.
For a Manhattan apartment, that might mean gaining useful storage without crowding the rooms. In a Brooklyn townhouse, it could mean making several floors feel connected while retaining architectural character. In a Westchester or Long Island home, it may involve bringing a kitchen, family room, primary suite, and service spaces into a more comfortable arrangement.
This guide focuses on the design decisions behind a complete renovation: what to consider, what to compare, and what to resolve before materials are ordered. For the wider process of budgets, approvals, and construction logistics, see DNB’s Home Renovation in NYC Expert Guide.
In This Guide
- What Makes an Interior Renovation Truly High-End?
- Start With the Layout, Not the Finish Schedule
- Adapt the Design to the Property You Actually Own
- Create a Design Language That Can Travel Between Rooms
- Plan the Kitchen as Part of the Living Environment
- Choose Materials for Their Role, Not Just Their Appearance
- Design Bathrooms Around the Work You Cannot See
- Make Custom Millwork Solve a Real Problem
- Layer Lighting Around the Way You Use the Home
- Include Comfort Systems in the Interior Plan
- Preserve Character Without Freezing the Home in Time
- Decide Where Customization Will Make the Biggest Difference
- Turn the Design Into Decisions the Build Team Can Use
- Your Design Decision Checklist Before Construction
- Frequently Asked Questions About Luxury Interior Renovation
- Begin With the Home You Want to Live In
What Makes an Interior Renovation Truly High-End?
A high-end renovation is defined by how well the design, construction, and everyday use fit together. Price alone does not explain the difference. A modestly sized kitchen with excellent proportions and carefully coordinated details can feel more resolved than a much larger room filled with expensive products.
Look for the quality of the relationships: a doorway aligned with the circulation route, cabinetry that accommodates what you own, lighting that lets you read comfortably, and surfaces whose maintenance suits your household. The result should feel intentional without asking you to think about every individual choice.
There is also quality you cannot judge from a photograph. Waterproofing beneath bathroom tile, access to mechanical equipment, properly coordinated appliance connections, and the preparation behind painted surfaces all affect the finished home. Those details need their own place in the scope.
DNB’s interior design services connect layouts, materials, furnishings, and custom detailing with the renovation work needed to carry them through. The goal is not to select beautiful objects independently. It is to develop a complete interior around the property and the people who live there.
“A beautiful material should earn its place in the room. We look at what it contributes to the whole interior, how it will be used, and whether the surrounding details let it do its job.”
Keren W., Partner & Head of Design, DNB Renovations
Start With the Layout, Not the Finish Schedule
Space planning should come before the final selection of stone, cabinetry, or fixtures. Otherwise, you risk making the room fit a product rather than choosing products that fit a useful plan.
Begin with the moments that are awkward now. Perhaps two people cannot cook at the same time. A hall becomes a storage area because the entrance has no proper place for coats. The living room has plenty of floor space, yet the only route to the bedroom runs between the sofa and television.
Describe the problem before proposing the construction solution. Removing a wall is one possible response to a cramped kitchen; reorganizing storage or changing a doorway might address the underlying issue with less disruption. The appropriate answer depends on measured conditions and technical review.
Furniture belongs in this conversation early. A dining table drawn at the wrong size can make a plan appear generous when it is not. Include chairs in use, door swings, appliance openings, and the space needed to move around the room. If a piece is staying, work from its actual dimensions.
When an Open Layout Helps, and When It Does Not
An open layout can improve connection, daylight, and the ability to gather. It can also expose cooking activity, reduce wall space for storage or art, and make it harder to separate work from family life.
Consider what you want to share between rooms and what you want to contain. A wider opening, a partially enclosed kitchen, or a carefully placed door may offer a better balance than removing every partition.
In an apartment, a layout proposal also needs to account for the building and existing services. In a house, additional space does not remove the need to check structure and circulation. A room should work on a measured plan before it is evaluated as an attractive rendering.
Adapt the Design to the Property You Actually Own
A design reference becomes useful when you understand the conditions behind it. A freestanding house and a city apartment may share a palette, but they rarely share all the same opportunities.
For a NYC apartment, useful questions include how new cabinetry interacts with radiators, whether ceiling heights can accommodate proposed lighting, and where services must remain accessible. Building requirements and the feasibility of plumbing or structural changes need confirmation before the layout is treated as final.
A townhouse calls for attention to vertical movement. Stairs, landings, doors, and storage on each floor shape daily life. Repeating selected materials can connect the levels, but the plan should still give bedrooms privacy and shared rooms the right relationship.
In a Westchester or Long Island house, consider the less photographed spaces: the route from parking to the kitchen, laundry, pantry, guest accommodations, and transitions to outdoor areas. Generous square footage is most valuable when those connections are comfortable.
These are starting points, not fixed rules for a region. An individual building, historic designation, community requirement, or previous addition may change the approach. DNB’s service areas provide a starting point for discussing the property and its location.
Create a Design Language That Can Travel Between Rooms
A cohesive interior does not require identical finishes everywhere. It needs enough shared decisions for the rooms to feel related.
Choose a small set of relationships to carry through the home. That could be a consistent wood tone, similar door and trim proportions, a family of metal finishes, or a balance between warm surfaces and quieter backgrounds. Then allow each room to respond to its own light, use, and architecture.
Look at what you see from one room into the next. The kitchen backsplash may be visible from the sofa. A bathroom door might open onto a hall with original molding. Flooring transitions and ceiling changes can make spaces feel connected or abruptly separate.
Develop the palette with physical samples wherever possible. Compare wood, paint, tile, stone, and fabric together rather than approving each in isolation. A surface that looks warm online may appear gray beside your flooring. A metal finish can look very different under evening lighting.
A material board is useful because it makes those relationships visible. It is not the final test: the team still needs to assess scale, installation, and performance in the proposed space.
Plan the Kitchen as Part of the Living Environment
A kitchen renovation should resolve circulation, storage, appliances, preparation space, lighting, and material relationships together. Cabinet color is an important choice, but it is not the starting point.
Describe how you cook and what usually stays on the counter. Coffee equipment, a mixer, serving dishes, and food storage need workable locations. Concealing everything may look appealing, yet a cabinet that is inconvenient to open every morning will not improve daily life.
Decide what the island needs to do before deciding how large it should be. Preparation, seating, storage, and gathering place different demands on the plan. Check the room with stools occupied and appliance doors open. Where an island makes movement uncomfortable, another arrangement may serve the household better.
Appliance selection needs to happen in coordination with cabinetry and services. Confirm the actual models, clearances, installation requirements, and access before fabrication. A panel-ready appliance is not automatically interchangeable with another model that has a similar description.
Stone decisions require the same care. The position of seams, edges, outlets, and backsplash transitions can change the appearance of a statement surface. Review those details before the slab is cut.
DNB’s kitchen renovation services bring these decisions into one design and construction scope.
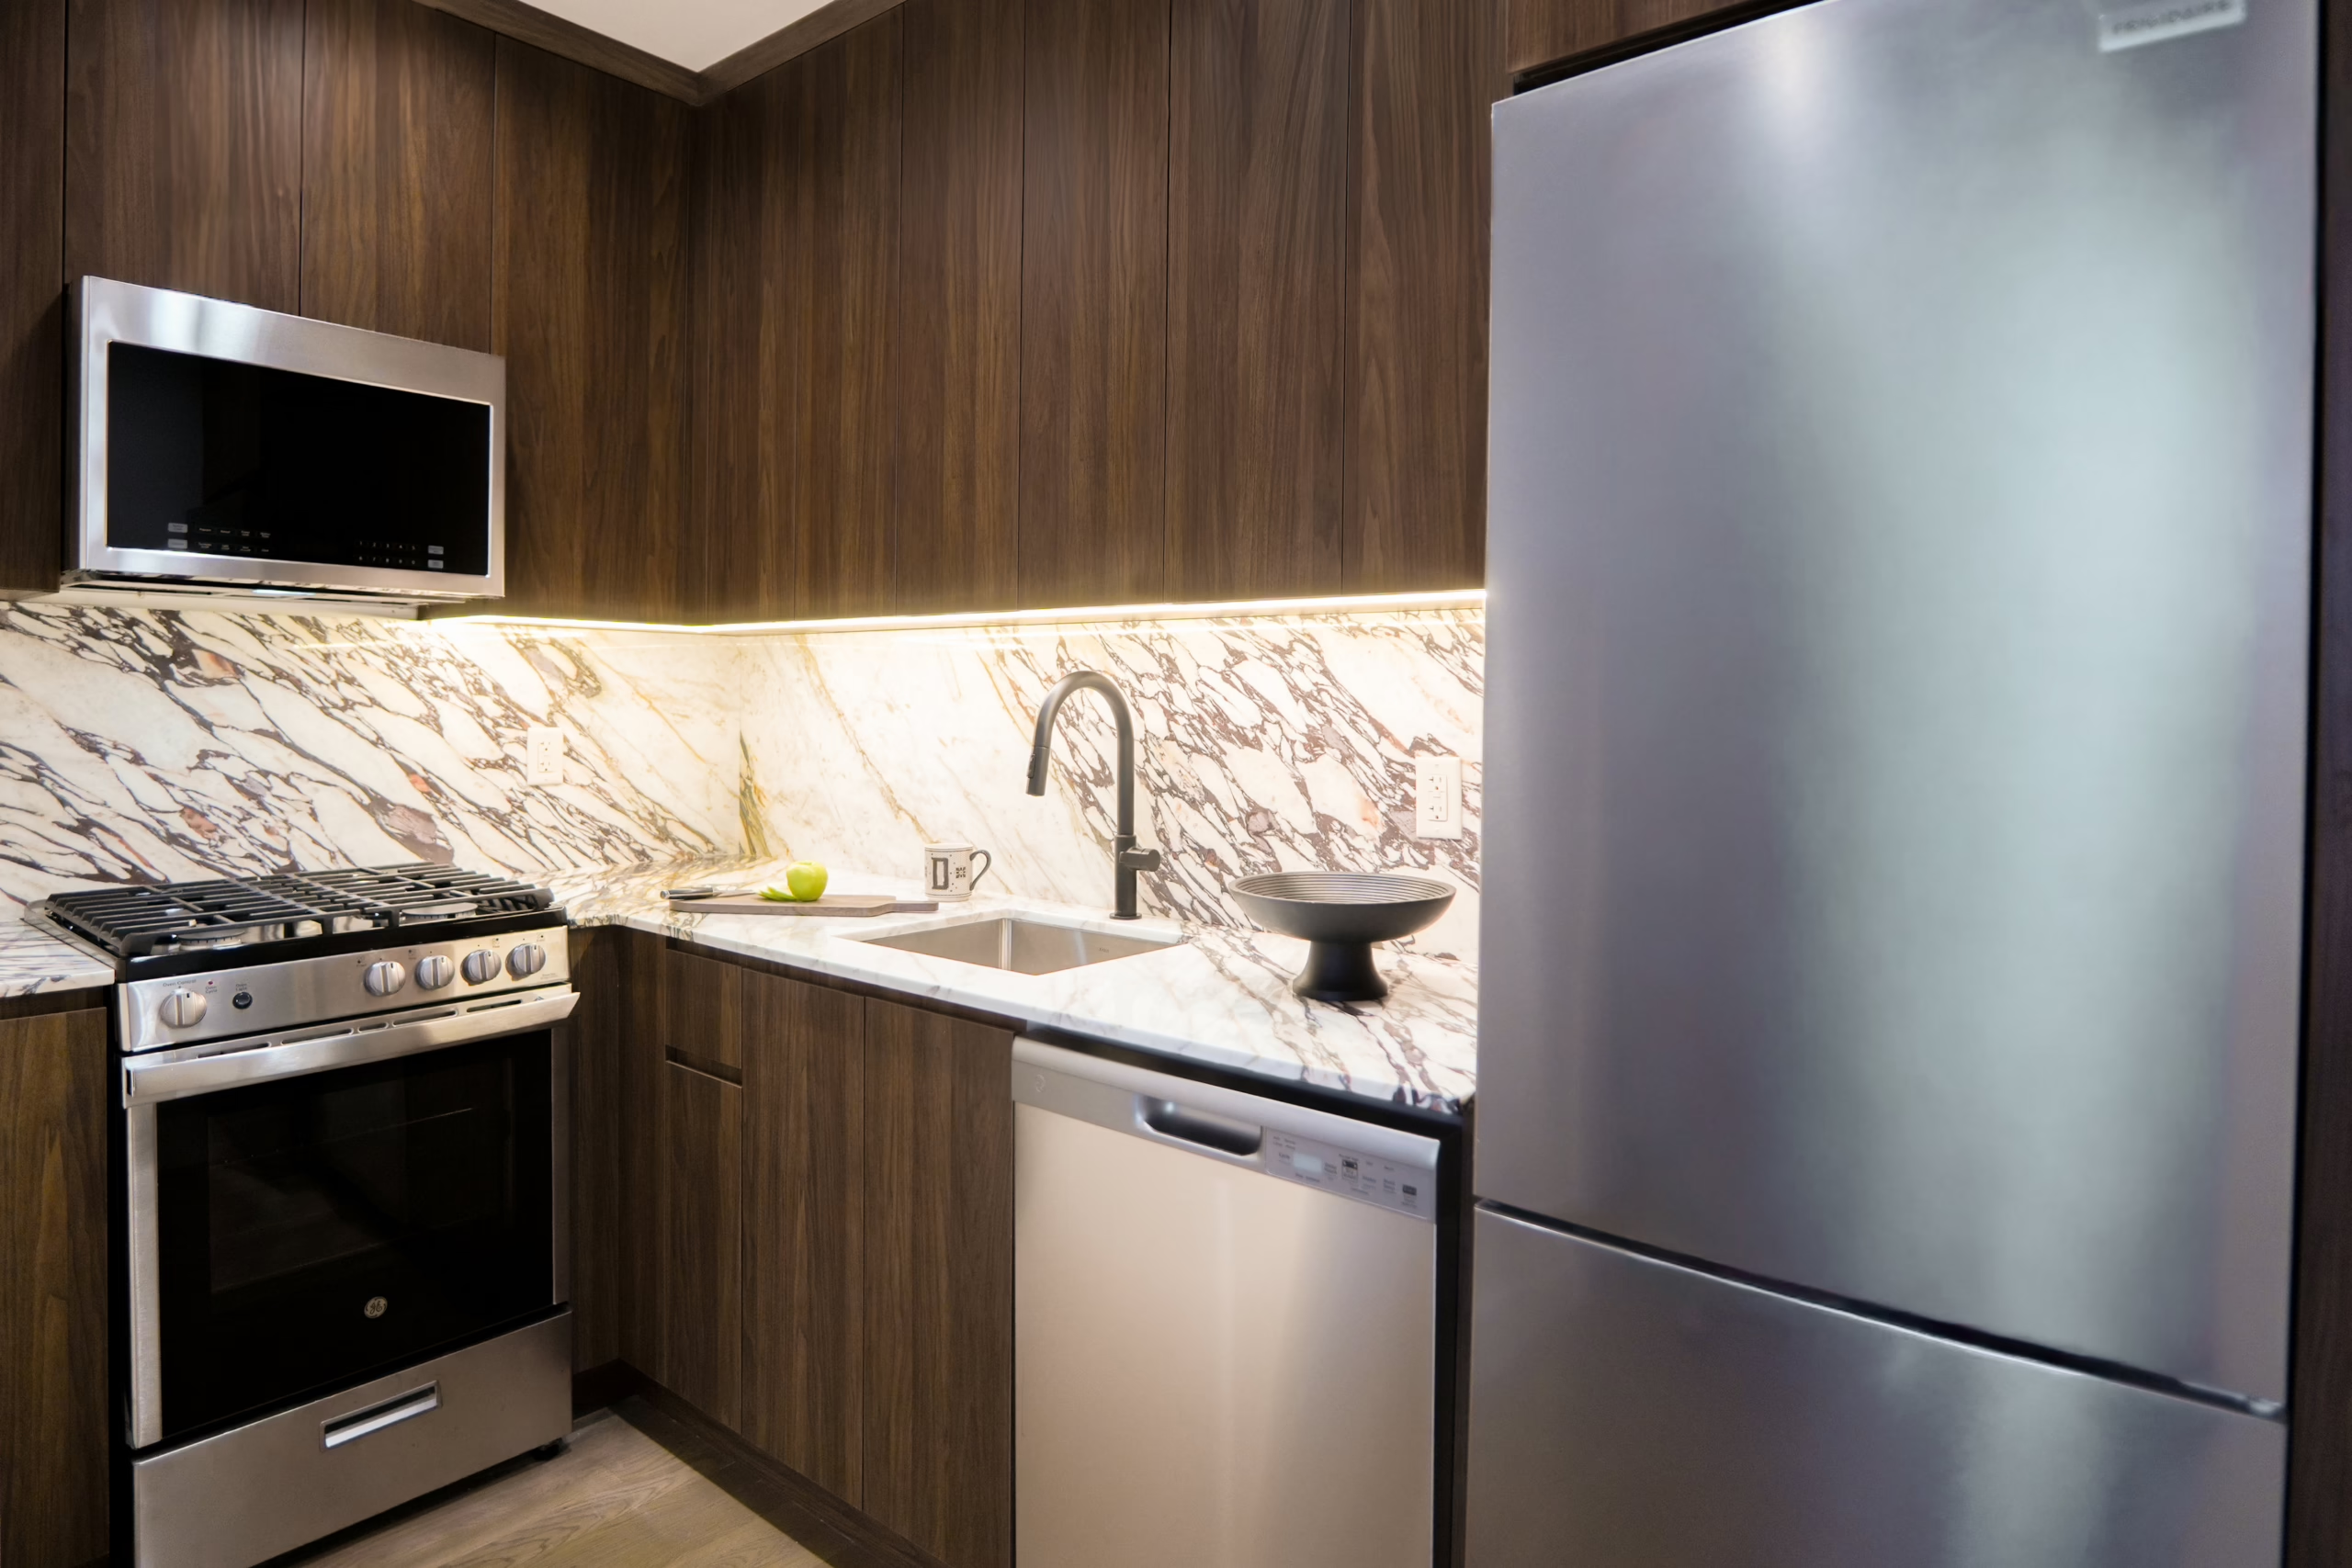
Project Example: Harlem Condo Kitchen
The challenge was a compact kitchen that needed better organization and appliance integration while accommodating the client’s specific design vision and budget. Custom walnut cabinetry with internal storage accessories addressed everyday storage, while compact integrated appliances kept the room visually uncluttered.
Calacatta Viola stone continued from the countertop into a full-height backsplash, giving the small palette one consistent focal point. Cabinetry fabrication, stone templating, appliance requirements, and outlet positions were coordinated together so the visible design could be carried through into installation.
The practical lesson: in a compact kitchen, choose the appliance models and storage arrangement alongside the cabinetry, then resolve outlets and stone junctions before fabrication. A statement surface works best when the supporting details are planned with equal care.
Choose Materials for Their Role, Not Just Their Appearance
The right material is one whose appearance, performance, maintenance, and installation suit the way it will be used. There is no single best finish for every luxury home.
Start with the experience you want, then discuss the practical conditions. Is this a kitchen for frequent cooking or occasional entertaining? Is the bathroom shared by children? Do you prefer surfaces that age visibly, or would signs of wear bother you?
Ask the designer and fabricator to explain the specific product, finish, and application. Materials within the same category can behave differently. A showroom sample is useful for color and texture, but it does not establish how an entire slab will look or whether it suits a particular detail.
Natural Stone, Engineered Surfaces, and Porcelain
Marble brings distinctive veining and variation, but acidic substances can etch its surface. Sealing does not make it immune to etching. Homeowners who choose it should understand the finish and care expectations rather than assume the surface will stay unchanged.
Quartzite can offer a different balance of appearance and performance, but suitability still depends on the actual stone and its characteristics. Confirm identification and care with the supplier instead of relying on a label alone.
Engineered quartz and porcelain offer other design possibilities. Check the chosen manufacturer’s requirements for heat exposure, cleaning, support, and fabrication. Edge details and large-format installations need review even when the product itself is familiar.
Compare Surface Materials Before You Commit
Use this comparison to frame the discussion with your designer and fabricator. Confirm the exact product, finish, application, and care instructions before ordering.
| Surface | Care and practical trade-offs | Confirm before ordering |
|---|---|---|
| Marble | Acidic spills can etch the finish; sealing is not protection against etching. Use suitable cleaners. | Actual slab, finish, maintenance expectations, seams, and edge details. |
| Quartzite | Confirm the stone’s identity and care needs with the supplier. Sealing needs vary. | Specific slab characteristics, supplier guidance, fabrication, and support. |
| Engineered quartz | Follow the selected brand’s care instructions. Caesarstone recommends trivets and cutting boards. | Product and finish, heat precautions, approved cleaners, seams, and edge design. |
| Porcelain | Use the selected manufacturer’s application, cleaning, and fabrication guidance. | Slab thickness, edge appearance, cutouts, support, and installer requirements. |
For natural stone, the Natural Stone Institute’s care guidance explains why stone identification, suitable cleaners, and sealing expectations matter. For engineered quartz, follow the selected manufacturer’s instructions; Caesarstone’s care guidance, for example, recommends trivets for hot cookware and cutting boards for preparation.
For any slab surface, review the actual material, proposed layout, visible seams, and transition to neighboring finishes. A photograph of a different slab is not an approval of the one that will enter your home.
Wood, Tile, Paint, and Hardware
Wood choices involve more than species. Construction, finish, grain arrangement, and environmental conditions affect both appearance and use. Compare a cabinetry sample with the flooring and nearby furniture, especially when several wood tones share the room.
Tile should be assessed for its intended application, not only its pattern. Confirm suitability for wet areas, the proposed substrate and installation system, and any relevant manufacturer guidance. Grout joints, cut locations, and transitions deserve their own drawings or layout discussions.
Paint and hardware often receive less attention because they come later. They can still change the result. Review paint in the actual room and confirm sheen, surface preparation, and the finish of doors and trim. Test hardware for feel and usability as well as appearance.
Design Bathrooms Around the Work You Cannot See
A high-end bathroom depends on a sound layout and carefully coordinated waterproofing, drainage, plumbing, ventilation, and electrical work. Tile and fixtures should follow that foundation.
Start with daily routines. Decide what needs to be accessible at the vanity, where towels will be kept, and how the room will be shared. A larger vanity is not always more useful if it narrows circulation or makes a door difficult to open.
Discuss shower details before ordering finishes. Thresholds, drainage, niches, glass, controls, and tile layout affect one another. A curbless arrangement, for example, needs to be evaluated against the actual construction conditions rather than added to the plan as a visual preference.
Lighting should support both practical tasks and a quieter evening setting. Vanity light, general illumination, and shower lighting have different jobs. Position fixtures in relation to mirrors and faces, not simply in a symmetrical ceiling pattern.
DNB’s bathroom renovation services coordinate the design with the installation work beneath and behind it.
Project Example: Flatiron Master Bathroom
The original bathroom had a tub, shower, and double vanity competing for room. DNB removed the existing arrangement and rebuilt the plan around better circulation and everyday functionality, using 3D renderings to develop the design before installation.
The new arrangement required plumbing modifications and waterproofing before tile and fixtures were installed. Zia tile, Cocoon fixtures, Buster & Punch details, and a Robern vanity formed the material direction, supported by electrical upgrades and coordinated tile, glass, and cabinetry work.
The practical lesson: changing the layout also changes the work behind the finishes. Resolve plumbing routes, waterproofing, lighting, and fixture requirements together before committing to tile layouts or ordering the vanity.

Make Custom Millwork Solve a Real Problem
Custom millwork is most valuable when it resolves a specific spatial or storage need while fitting the architecture. It can turn an awkward recess into useful cabinetry, organize a living room around books and media, or make a dressing area work around the owner’s belongings.
Begin with an inventory. The dimensions of books, equipment, clothing, and serving pieces can affect cabinet depth and internal organization. Decide what should remain visible and what needs to be concealed. Open shelving gives objects a place in the composition, but it is not a substitute for all closed storage.
Then review the joinery in context. Door proportions, reveals, grain direction, hardware, lighting, and the relationship to existing trim all influence how built-ins sit in the room. A technically useful cabinet can still feel intrusive if its scale or alignment is wrong.
Technology needs room in the drawings. Equipment may require ventilation, power, cable routes, and maintenance access. Those requirements should be confirmed before fabrication. A concealed device is only convenient if it can still be used and serviced.
A full-home renovation gives the team an opportunity to coordinate millwork across several rooms. That does not mean repeating the same cabinet in each space. It means agreeing on a level of detail and a material direction so the pieces belong to the same home.
“Custom work becomes more predictable when the decisions are made before fabrication. The drawings need to explain not only how a piece will look, but what must fit inside it and how it connects to the room.”
Ben L., Project Manager, DNB Renovations
Layer Lighting Around the Way You Use the Home
A useful lighting plan combines general illumination, light for specific activities, and light that shapes the room’s atmosphere. A decorative fixture may contribute to more than one of those roles, but it rarely replaces the entire plan.
Think through a normal day. You may need clear light for breakfast preparation, comfortable light at a work area, and a softer setting once the kitchen is no longer in use. Reading, dressing, art, and circulation create their own requirements.
Locate furniture, cabinetry, and mirrors before settling every fixture position. Recessed lights placed without reference to the room can create an orderly ceiling while missing the places that need light. Under-cabinet lighting needs to be coordinated with the cabinet construction and the view from neighboring spaces.
Discuss controls with the same care as fixtures. Decide which lights operate together, where switches should sit, and whether a dimming or scene arrangement fits your habits. Confirm compatibility among fixtures, drivers, dimmers, and any control system before ordering.
Color appearance also matters. Review light sources alongside the proposed materials rather than assuming that a familiar specification will produce the same effect everywhere. Ask for samples or a demonstration where the decision is important to the room.
Treat Window Treatments as Part of the Design
Window treatments affect privacy, daylight, views, and the proportions of the room. Plan them before ceiling and wall details are finalized, particularly where you want concealed pockets or motorized operation.
Consider how the room will be used at different times. A living space overlooking a garden may need glare control without losing its connection to the view. A bedroom may need a more complete light-blocking arrangement. Some rooms benefit from layers rather than one product doing everything.
Confirm mounting space, operation, power where needed, and access for maintenance. A treatment that looks discreet in a photograph may need hardware or clearance your existing window does not provide.
Include Comfort Systems in the Interior Plan
Heating, cooling, ventilation, acoustics, and service access affect how an interior feels long after the visual novelty wears off. They belong in the renovation discussion before ceilings and cabinetry are fixed.
Review existing conditions and the proposed layout with the appropriate professionals. A new room arrangement may change the way systems need to serve the home. Ducts, grilles, pipe routes, controls, and equipment access can also influence visible design.
Ask what can realistically be improved within the project. A particular acoustic goal needs more than an appealing product description. Footfall, airborne sound, doors, and building conditions may require different responses. The team should identify the source of the problem before promising a result.
For technology, decide which functions are genuinely useful. Lighting control, networking, window treatments, and security can support daily comfort, but the system should remain understandable to the household. Discuss ordinary operation, maintenance, and what happens when a component needs replacement.
DNB’s full-home renovation services take a coordinated approach to layout, systems, and finishes. This is especially useful when improvements in one room affect several others.
Project Example: Sag Harbor Full Home Renovation
The brief was a Hamptons retreat suited to both entertaining and everyday family life. DNB opened the kitchen layout by removing unnecessary walls, pairing white oak cabinetry and matte white finishes with a statement stone island. A pantry and customized laundry room supported the daily routines beyond the main living spaces.
The wider scope connected custom millwork and in-house fabricated closets with new windows and doors, electrical upgrades, layered lighting, window treatments, and HVAC improvements. Bathrooms were redesigned with custom vanities and freestanding tubs, while a sauna and gym added spaces tailored to the household.
The practical lesson: plan the less visible support spaces and building systems alongside the rooms that lead the design. In a full-home renovation, comfort and usability depend on how those decisions work together.

Sag Harbor Full Home Renovation by DNB Renovations: custom shelving, layered lighting, and window treatments coordinated within the living room.
Preserve Character Without Freezing the Home in Time
An older home can become more comfortable without losing the architectural qualities that make it distinctive. Start by identifying those qualities rather than assuming every existing detail must stay or every surface must be replaced.
Proportion may matter as much as ornament. A doorway, stair, window arrangement, or ceiling line can give a room its identity even when the finishes change. Assess what is original, what was added later, and what is in a condition suitable for retention or restoration.
New work should respond to that assessment. Contemporary cabinetry can sit comfortably beside traditional trim when its scale is considered. A bathroom can feel current without relying on finishes that are unrelated to the rest of the property.
Where features are to remain, include their protection and any restoration in the scope. Retention needs a construction plan, not just a design intention. If a property has historic protections, confirm the applicable requirements with the relevant professionals before committing to affected work.
The West Village Townhouse provides a DNB example of a broad, multi-level scope involving layouts, bathrooms, custom millwork, a redesigned kitchen, and smart-home integration. Its portfolio page currently identifies the project as in progress, so it should be read as a documented project scope rather than a completed before-and-after case study.
Decide Where Customization Will Make the Biggest Difference
A luxury renovation budget should reflect the complete outcome, including the construction needed to support visible finishes. To decide where to invest, compare choices against your priorities rather than assuming the most customized option is always the best.
Custom cabinetry can be valuable where the room has unusual dimensions or specific storage demands. In another area, a well-chosen standard product may perform the required role without the same fabrication effort. The comparison should include fit, flexibility, lead time, installation, and maintenance.
Give particular attention to decisions that are difficult to change later: the layout, plumbing arrangement, lighting infrastructure, and the preparation behind finishes. Furniture and decorative layers still deserve planning, but they do not have the same replacement consequences as work concealed inside the building.
Review alternatives as complete installed solutions. A less expensive material may require additional fabrication or preparation. A more expensive choice may simplify another detail. The team needs to explain the trade-off within your actual project.
Avoid using another home’s budget as a promise for yours. Access, existing conditions, scope, specification, and approvals can change the work substantially. Use the first consultation to establish priorities and a realistic framework for design development.
“The budget conversation is most useful when we understand the homeowner’s priorities. We can then discuss where a custom solution adds meaningful value and where another approach may support the same goal.”
Danielle S.K., Partner & Head of Sales, DNB Renovations
Turn the Design Into Decisions the Build Team Can Use
A finished-looking rendering is a communication tool, not a complete construction package. It helps you assess atmosphere, proportion, and the relationship between finishes. The team still needs the drawings, specifications, and technical coordination appropriate to the project.
As the design develops, confirm the specific products and details being approved. Record appliance models, fixture finishes, cabinet arrangements, tile layouts, lighting requirements, and any items supplied by the homeowner. A general description leaves more room for interpretation than a documented selection.
Keep revisions visible. If a fixture changes, check whether it affects plumbing, electrical work, clearances, or a fabricated component. A substitution that looks similar can have different installation requirements.
Agree on how changes will be reviewed, priced, and approved. A clear record helps everyone understand what is included and what changed. It also gives the construction team a reliable basis for procurement and scheduling.
DNB’s renovation process provides an overview of the stages that connect planning with site work. For homeowners, the practical aim is to approve decisions with enough information that the design can be carried through consistently.
When to Finalize Key Design Decisions
Use this sequence to identify decisions that affect later work. Exact timing depends on the project and the team’s procurement and construction plan.
| Decision | When to finalize | What it affects |
|---|---|---|
| Layout and retained furniture | Before final selections and technical coordination. | Circulation, openings, service locations, and furniture clearances. |
| Appliance and fixture models | Before cabinetry fabrication and relevant service work. | Cabinet dimensions, power, plumbing, ventilation, and installation access. |
| Cabinetry and storage details | Before fabrication, coordinated with appliances and equipment. | Internal organization, reveals, hardware, lighting, and service access. |
| Stone and tile layouts | Confirm material selection early; approve fabrication layouts after dimensions are verified. | Seams, cutouts, edges, joints, transitions, and alignment. |
| Lighting and controls | While layout and millwork develop, before wiring and finish work are finalized. | Fixture positions, circuits, driver/dimmer compatibility, and access. |
| Window treatments | Before affected ceiling and wall details are finalized. | Mounting clearance, concealed pockets, power, operation, and maintenance. |
Your Design Decision Checklist Before Construction
Before the project moves into construction, work through the following questions with the team. Some answers will depend on technical review, but unresolved items should have a clear next step.
- Have the main household priorities been reflected in the layout, rather than only in the finish selections?
- Are retained furniture, art, and architectural features included in measured planning?
- Have appliance, fixture, and equipment specifications been checked against cabinetry and services?
- Are stone layouts, tile transitions, millwork details, and visible finish junctions sufficiently defined?
- Does the lighting and control plan support cooking, reading, dressing, circulation, and evening use?
- Have window-treatment mounting, power needs, and maintenance access been considered?
- Are the required technical reviews and applicable approvals identified for the proposed work?
- Is responsibility clear for product ordering, substitutions, design revisions, and homeowner-supplied items?
- Do the scope and budget distinguish included work, allowances, exclusions, and unresolved conditions?
- Is there an agreed way to document decisions and review changes during construction?
This checklist is a conversation aid, not a substitute for project-specific professional review. Its value is in making the remaining decisions visible before they affect fabrication or site work.
Frequently Asked Questions About Luxury Interior Renovation
What is the difference between interior design and interior renovation?
Interior design develops the layout, material direction, furnishings, lighting, and details of the home. Interior renovation carries the relevant changes into construction. The two overlap where a design decision affects walls, services, cabinetry, and installation. A coordinated approach helps the proposed interior fit both the household and the building.
Do I need a complete gut renovation to achieve a high-end interior?
No. The scope should follow the condition of the home and the changes you want to make. Some projects can retain useful existing elements. Others need broader access to update systems or substantially alter the layout. Evaluate the property before deciding that either approach is necessary.
Should I choose a style before contacting DNB?
You do not need a finished design or a precise style label. Bring a small selection of references and explain what you like and dislike. Photographs of your home, available plans, the pieces you want to keep, and a description of your daily routines give the conversation useful context.
How do I choose between custom and standard cabinetry?
Compare the options against the room’s dimensions, storage needs, desired details, and installation requirements. Custom cabinetry may resolve constraints that standard products cannot. Where a standard option fits the brief well, it can still belong in a considered interior. Review the whole installed solution rather than the cabinet price alone.
Can a kitchen have statement stone without overwhelming the home?
Yes, if the stone is considered alongside cabinetry, lighting, adjacent rooms, and other visible surfaces. Review the actual slab and proposed fabrication layout. A quieter supporting palette can give expressive stone room to lead without requiring every room to repeat the same statement.
When should lighting and smart controls be planned?
Plan them while the layout, furniture positions, and cabinetry are being developed, before the relevant wiring and finish work are finalized. Early coordination helps establish fixture locations, power, control compatibility, and access. Not every household needs a complex system; choose functions you will use comfortably.
Can an older home feel modern without losing its character?
Yes. Identify the architecture and details worth retaining, then develop new work in relation to them. The approach may involve restoration, selective replacement, or contemporary additions. The right balance depends on condition, the desired layout, and any applicable historic requirements.
How long does a luxury interior renovation take?
There is no reliable universal timeline. Design development, approvals, existing conditions, custom fabrication, material availability, and the construction scope all affect the schedule. Ask for a project-specific sequence that distinguishes planning and procurement from site work, and revisit it when the scope changes.
Can DNB coordinate design and construction for the whole home?
DNB offers interior design and full-home renovation services, with published projects showing the coordination of layouts, systems, cabinetry, and finishes. Discuss the property and proposed scope with the team to establish the services and specialist input your project needs.
Begin With the Home You Want to Live In
The most useful starting point is not a perfect image. It is a clear account of what works in your home, what does not, and how you want the rooms to support your life.
Bring available plans, current photographs, a few references, and the dimensions of important pieces you want to retain. Share your investment expectations and timing, including any questions that still feel unresolved. You do not need to solve them before the first conversation.
DNB Renovations brings design and construction into the same discussion, helping homeowners develop complete interiors rather than assemble disconnected updates. Explore the DNB project portfolio to see the range of work, or meet the design and project management team.
If you are considering a full apartment, townhouse, or home renovation in NYC, Westchester, or Long Island, contact DNB Renovations to discuss your property, your priorities, and the next steps toward a considered interior.